Updating Bell Schedules and Active Terms
BELL SCHEDULES
Log in to the Hero Setup portal at https://setup.heropowered.com and select the bell icon.
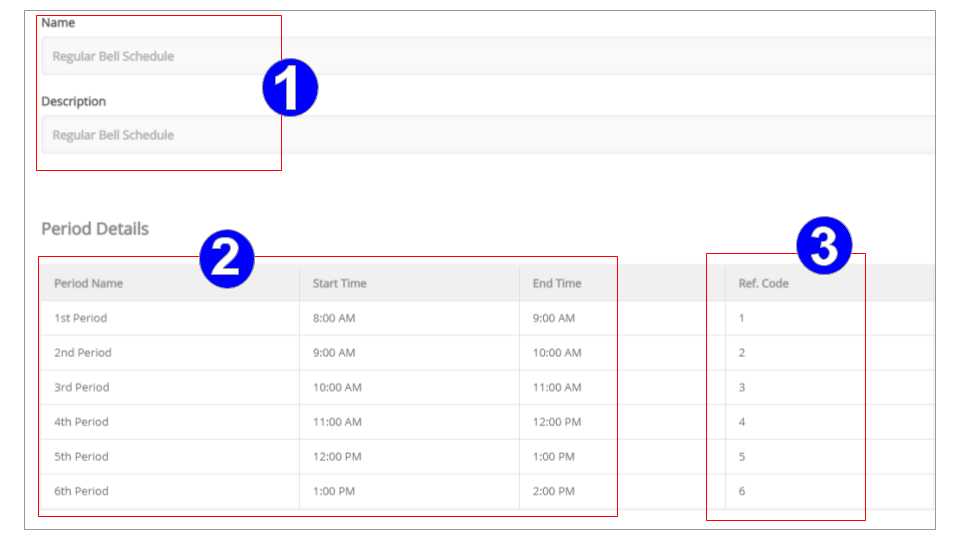
Step 1: Give your Bell Schedule a Name
Step 2: Add or Modify Period Names and Times

Step 3: Confirm that the Reference Codes are correct so that teachers can see their class rosters.
IMPORTANT: Log in to the Hero Access portal > Student Lookup > Schedule to confirm the PERIOD column matches the "REFERENCE CODE" in the setup portal as seen below.
Step 4: Save Your Bell Schedule.
*You may add multiple bell schedules for A/B schedules, assembly schedules, early release schedules, etc. In each case, confirm that the reference codes match the student schedules for each unique schedule.
ACTIVE TERMS
Setting new Active Terms at the beginning of a school term or semester is important in making sure the attendance data collected is accurate, and will ensure that your teacher and student rosters are populated correctly.
Depending on your Student Information System (SIS), your Active Terms normally follow the guidelines that are shown below. For the purposes of this Guide we will be using screenshots using data exported from PowerSchool.
Log in to the Hero Setup portal at https://setup.heropowered.com .
Step 1: Click on the “Bell Schedule” icon.
Step 2: Verify and select current Active Terms.

Step 3: Click “Save Terms” to save your changes.
For more assistance:
Start a Live Chat now.
Comments
0 comments
Article is closed for comments.