What is covered in this article?
- Re-Enrollment Options in SchoolMint
- How to rollover existing student records in SchoolMint
- How to import records via CSV import
- Rolling over NEW student registration records to the next academic year
- Rolling over EXISTING (current students) re-enrollment records to the next school year
- How to import records via API integration (*only for PowerSchool, Aeries, Software Answers customers)
- How to manually add a single student record
Returning Student Re-Enrollment Options
Creating re-enrollment student records in SchoolMint is a simple process! Once records are created, the students can login to indicate their Intent to Return or complete Re-enrollment Packets.
There are 4 ways to create re-enrollment records in SchoolMint:
|
Option 1) |
Option 2) |
Option 3) |
Option 4) |
|
Do this yourself Process time: None |
Provide a CSV file with your data Processing time: 2 weeks |
Only for customers with completed SIS integration Processing time: 2 weeks |
Do this yourself Process time: None
|
|
Suitable for existing SchoolMint student records |
Suitable for creating students in bulk |
Suitable for creating students in bulk directly from SIS |
Suitable for adding singular students after bulk import |
Option 1) Rollover existing student records in SchoolMint
- Advantages: Independently "roll over" returning students at any time - no need to wait for processing by SchoolMint engineering
- Considerations: If your SIS is your source of truth and you have made a lot of updates to your student information in your SIS, then your students will not have the most up-to-date information on SchoolMint. However, parents can still update their information on SchoolMint.
-
Next Steps: See steps 2A and 2B below
- You need to rollover records in two steps:
- A) Rolling over NEW student registration records to the next academic year
- B) Rolling over EXISTING (current students) re-enrollment records to the next school year
- You need to rollover records in two steps:
Part 1A) Rolling over NEW student registration records to the next academic year
- Step 1: Navigate to the Application Index
- Step 2: Filter your search to only one school, one grade, and one specific status (Accepted, Registration In Progress, Registration Completed, Registration Verified) to find the returning students eligible for re-enrollment
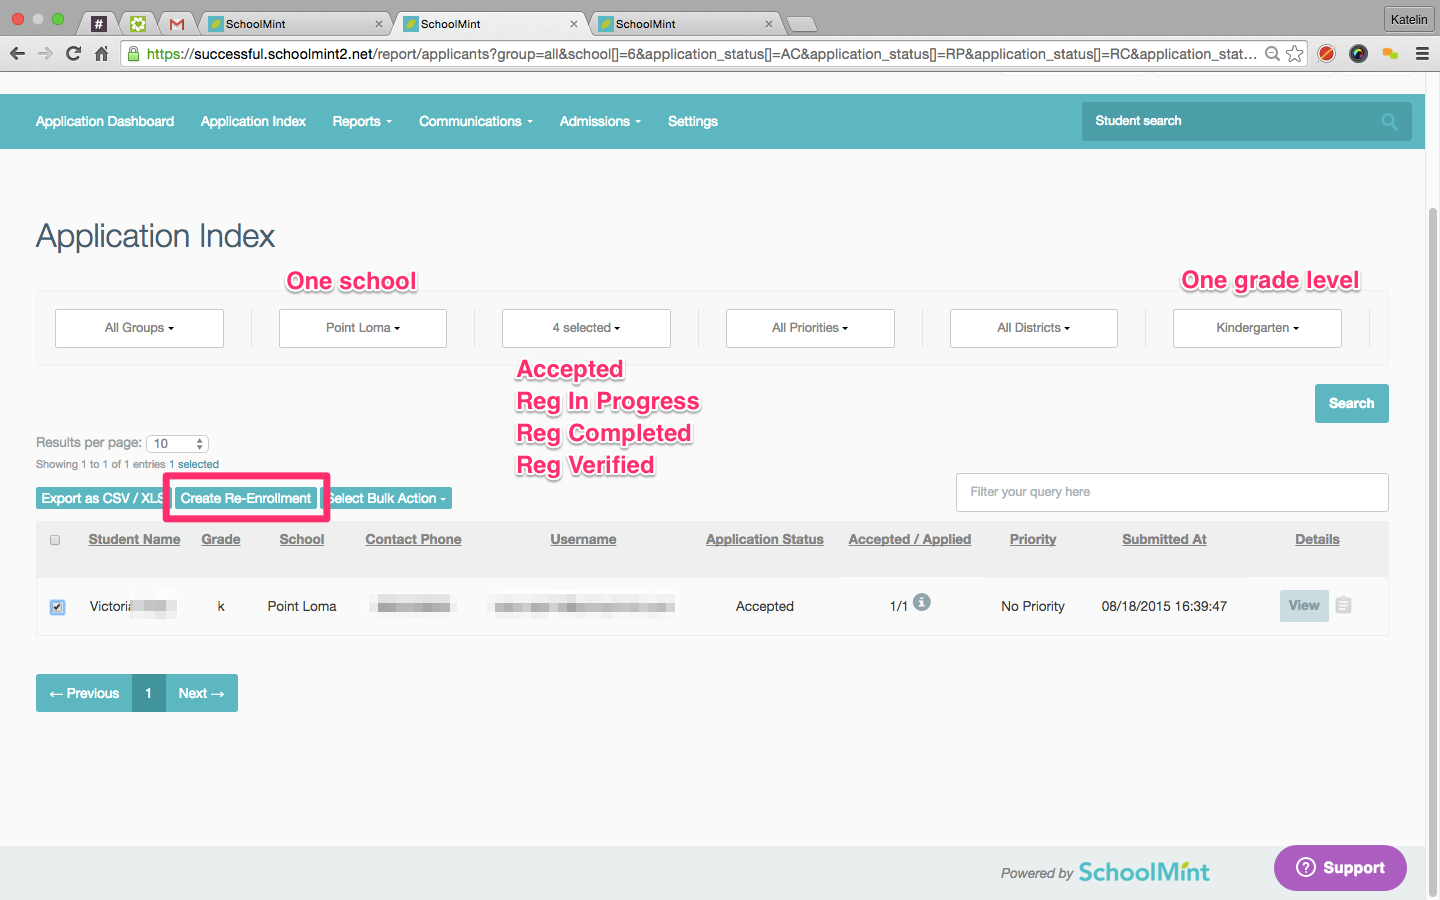
- Step 3: Select the student(s) that you'd like to move over to the next year. Then click Create Re-Enrollment Record
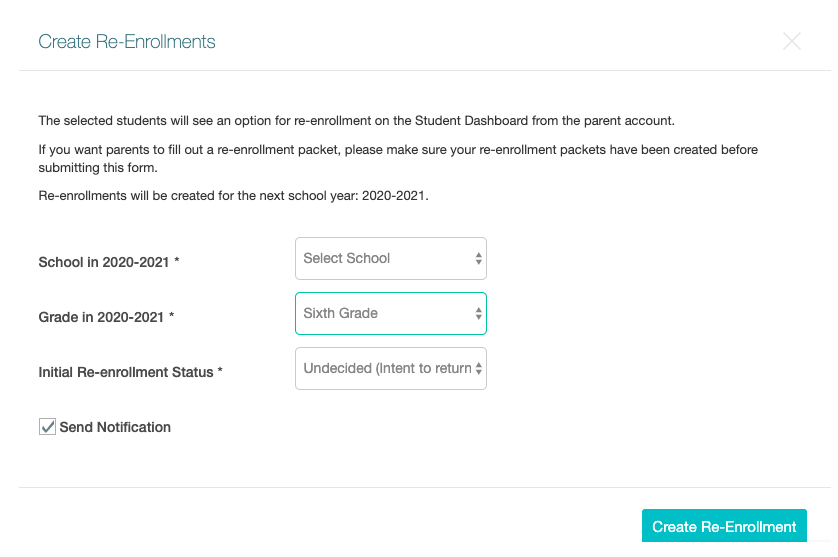
- Step 4: Next, you will see a pop-up prompting you to select the next school and grade to create the selected student records for the next academic year
-
Step 5: Select Initial Re-Enrollment Status:
- "Undecided (Intent To Return)" allows students to indicate if they are Returning or Not Returning for the next academic year before they fill out the re-enrollment packet for the next academic year.
- "Not Started (Fill out Re-enrollment Packet)" assumes students are returning and to fill out a re-enrollment packet for the next academic year
-
Step 6: Select or deselect the Send Notification checkbox. If this box is checked, all families will receive an automatic notification
- You can view/edit this notification under Settings > Manage SMs and Email Templates for notification type Re-enrollment Undecided or Re-enrollment Not Started
- Step 7: Click Create Re-enrollment. You will see your results in Admissions > Manage Re-enrollments in the next academic year.
Part 1B) Rolling over EXISTING (current students) re-enrollment records to the next school year
- Step 1: Toggle to Admissions > Manage Re-Enrollments
- Step 2: Filter for the students in the same grade, school, and status. Select the students you would like to copy over into the next academic year
- Step 3: Click Select Bulk Action > Create Re-enrollment Record

- Step 4: Next, you will see a pop-up prompting you to select the next school and grade to create the selected student records for the next academic year
-
Step 5: Select Initial Re-Enrollment Status:
- "Undecided (Intent To Return)" allows students to indicate if they are Returning or Not Returning for the next academic year before they fill out the re-enrollment packet for the next academic year
- "Not Started (Fill out Re-enrollment Packet)" assumes students are returning and to fill out a re-enrollment packet for the next academic year

-
Step 6: Select or deselect the Send Notification checkbox. If this box is checked, all families will receive an automatic notification
- You can view/edit this notification under Settings > Manage SMs and Email Templates for notification type Re-enrollment Undecided or Re-enrollment Not Started
- Step 7: Click Create Re-enrollment. You will see your results in Admissions > Manage Re-enrollments in the next academic year.
Option 2) Import returning student records via CSV import
- Advantages: Import the most up-to-date student and guardian information from your SIS into SchoolMint
- Considerations: Takes approximately ~2 weeks to process and test the import into SchoolMint once the import template has been finalized with no formatting errors or missing data.
- Next Steps: Please consult your Customer Success Specialist or Customer Success Manager to complete this import
Option 3) Import records via API integration (only available for PowerSchool and Aeries customers)
- Considerations: This process is only available for PowerSchool and Aeries customers. The processing time for this import is approximately 4 weeks
- Next Steps: If you use an SIS that has an API integration, please consult your Customer Success Specialist or Customer Success Manager to complete this import
- To learn more about SIS integration, read our SIS Overview.
Option 4) How To Add a Single Student Record Manually
- This method is ideal when you need to manually create an individual re-enrollment record for a student who does not yet exist in SchoolMint. Typically, students who were not included in the import processes described above can be added this way
- Step 1: Navigate to Admissions > Manage Re-Enrollments
- Step 2: Click Search
-
Step 3: Click on the green Add Student Button

- Step 4: Fill out the requested information to create the new Re-Enrollment record

-
Step 5: Select or deselect the Send Notification checkbox. If this box is checked, all families will receive an automatic notification
- You can view/edit this notification under Settings > Manage SMs and Email Templates for notification type Re-enrollment Undecided or Re-enrollment Not Started
- Step 6: Click Create Re-enrollment
- Step 7: Using this method, creating a new student record will automatically generate an access code for that re-enrolling student. Learn more about how to help families with access codes.
PLEASE NOTE
- Be sure to de-select "Send Notification" if you do not want the parent to be notified when the re-enrollment is added.
- An email address and mobile phone are required. If either of these is not available, you can fill in generic information to submit the record.
- Learn more about how to help families with access codes.
VIDEO: Please see the following steps below on how to roll over student records:
-------------------------------------------------------------------------------------------------------
Still have questions? Email us at support@schoolmint.com.
Comments
0 comments
Article is closed for comments.