Custom forms may be used in Applications, Registration, Re-Enrollment and General Packets.
What is covered in this article?
- Best Practice: Mindset When Editing Forms
- Where to Find your Forms
- How to Create a New Form
- How to Unlock Existing Forms
- How to Edit Existing Forms
- How to Add a New Field to your Form
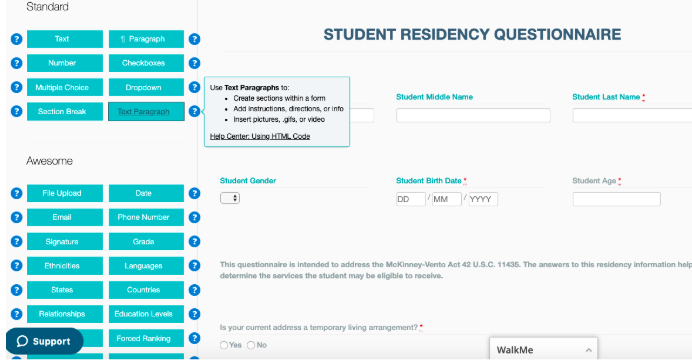
- Standard Field Types
- Custom Field Types & Choices
- Add a File Upload Button
- How to Drag Fields to Reorder
- Required vs Not Required Fields
- Add HTML Formatting
- Add Conditional Logic (show questions based on previous answer)
- Admin-Only Fields
- In Site Support: WalkMe Assistance
Custom Form Editing Guide
1) Best Practice: Mindset When Editing Forms
There are two primary goals to keep in mind when creating/updating forms:
- Goal 1: Ease-of-use: you should have as many fields as possible auto-populate for parents (i.e. use standard fields) so they are not entering the same information multiple times across forms. Whenever possible, you should provide answer choices for parents (dropdown, multiple choice, etc.) rather than free-form text fields. You want to limit parents from typing in responses that will vary as they will make reporting and integrating with your SIS more difficult.
- Goal 2: Control your data for compatibility with SIS: ask your SIS manager/registrar to review your forms with an eye toward moving/entering data from SchoolMint into your SIS. Providing answer choices for parents will standardize the responses you receive.
2) Where to Find your Forms
- Step 1: In your school site, confirm that you are in the correct enrollment year by using the dropdown menu in the upper right-hand corner of your site. You do not want to edit past enrollment year forms as those are active (have captured student data) and will result in data loss if changed.
- Step 2: In the blue navigation bar, go to the Settings page and select Manage Forms.
- Step 3: On the Custom Forms tab, select the form you would like to edit by clicking the Action dropdown menu and selecting Edit.
3) How To Create a New Form
- Step 1: From the same Custom Forms tab, click the green button “Create a new form”
- Keep the default selection of custom form to be used in a packet. This will allow the form to be available to be added to a Registration or Re-enrollment packet.

- Step 2: Name the form and click Save and go to Add Questions
4) How to Unlock Existing Forms
- As a preventative measure, all existing forms will remain locked so edits do not mistakenly result in data loss
- How to Unlock Existing Forms: Email the Admin Support team at support@schoolmint.com with the name of the form that you would like unlocked for editing
5) How to Edit Existing Forms
- Step 1: Go to Settings > Manage Forms > Custom Forms Tab
- Step 2: Find the form you wish to edit > click Action > Edit
- Step 3: You will have an opportunity to edit the Forms Label (name). Then, click Save and go to Add Questions to navigate to the form builder.
- Step 4: In the editor view for each form, click on each field to review if it is a Standard Field (black label appears) or a Custom Field (no label).
- A Standard Field will auto-populate with information that a parent has already provided in their family account or application. Parents may view Standard Field information for accuracy and may update it, if desired.
- A Custom Field will remain blank until the parent inputs information (no auto-fill).
- Step 5: You may edit each field on your form by clicking on the field and viewing the settings in the left sidebar
- Best Practice: (see below) We recommend leaving the Middle Name field and the AddressStreet2 fields as NOT REQUIRED since many cultures do not assign Middle Names, and many families do not have an apartment/unit number with their address. These fields may BLOCK your parents from submitting if they are marked as required.
6) How to Add a New Field to your Form
If you realize there’s additional information you’d like to capture on your existing forms for the upcoming enrollment year, or if you are creating a new form from scratch, here’s how to add a field:
- Step 1: Click in the form where you would like to add the field and in the left sidebar, click on the tab: Add New Field
- Step 2: Select the Standard Field or Custom Field that meets your needs.
- Step 3: By clicking on the Custom Field option and Yes/No button, this field will drop into the form.
- Step 4: Add a field title (and description) in the Label area and select settings, such as Required.
- Step 5: When editing and building forms, we recommend that you periodically click the Save & Preview Form button in the upper right-hand corner of your editor view to confirm how the form will appear for your parents. The Preview mode will display the form in a separate tab.
7) Standard Field Types
Standard Fields are those that capture the most common information across school forms. These fields will auto-fill with information that a parent has already input in the SchoolMint system (from their application, account creation, etc.). Any edits to information in Standard Fields will also update the student's information across SchoolMint.
** We recommend that you use as many Standard Fields as possible to reduce the amount of typing required for your families. Using Standard Fields will also ensure that you are capturing data in a consistent format that will make reporting easier and save time when moving data between SchoolMint and your SIS. This will help ensure consistent data throughout SchoolMint!
Blocks of Standard Fields: There are a handful of Standard Fields that will be added to your form as a pre-set block of fields, rather than a single field:
- Student Physical Address Fields
- Student Mailing Address Fields
- Guardian 1 Fields
- Guardian 2 Fields
- Emergency Contact 1 Fields
- Emergency Contact 2 Fields
- Emergency Contact 3 Fields
- Contact 1 Fields

- For example, by selecting Guardian 1 Fields, a block of 14 fields will be added to your form. These are the most common fields relating to a Guardian. Unfortunately, you cannot “unbundle” the block of fields, but you may use the red X next to a field in the block to indicate that you do not want it to display on the form for your parents.
8) Custom Field Types & Choices
What are Custom Fields?
- If you don’t see a question you are looking for in the Standard Fields, you can use Custom Fields to customize the questions in your registration forms. Please note that custom fields will NOT autofill with previously collected data, like Standard Fields do
- Field type is the specific type of form field you include in a question (text field, dropdown, phone number, etc)
- Field choices are the specific range of choices you can select from, either targeted or open-ended (Open text field? List of dropdown options?)
How can I create powerful forms and collect exactly the data I need?
- Step 1: Guide families to give you exactly the information you need by selecting the field type that best fits your needs to collect clean and accurate information from families
- Use a phone number field!
- Do you need to collect a Yes or No answer?
- Would you like families to select only one or multiple answers?
- Do you need to collect a specific Relationship format for your SIS?
- Step 2: Craft intentional, targeted questions to ensure consistent and clean data by limiting parents typing in information
What types of custom fields can I include?
- There are two types of custom fields to include: Basic Fields or Awesome Fields
Basic Fields:
Text - allows families to enter text responses

Paragraph - allows families to enter longer text responses

Dropdown - allows families to select a single response from a dropdown list of answers

Multiple Choice - allows families to select a single response

Checkboxes - allows families to select multiple responses (Pro Tip! Common use: Race)

Awesome Fields:
To collect clean and valid contact information:
Email - requires families to input a valid email address (will flag an error if the email is invalid)

Phone Number - requires families to input a valid 10-digit phone number (xxx-xxx-xxx) (will flag an error if the phone number is invalid)

Relationship - automatically include a list of family relationship options, options cannot be edited

To collect demographic information:
Gender - Label can be edited, options cannot be edited

Ethnicity - Label can be edited, options cannot be edited

Language - Label can be edited, options cannot be edited

State - Label can be edited, options cannot be edited

Country - Label can be edited, options cannot be edited

To provide informational text (that does not require action or response):
Section Break / Text Paragraph - allows you to add text to your forms, without needing any input from the family

To collect confirmation and/or requirements from parent/guardians:
Yes / No - families can choose “Yes or No”

Date - allows families to select a date from the date, month, year (** Pro Tip: You can set to default as “Today’s Date”)

Signature - families can enter a signature using their mouse or finger (on mobile web)

File Upload - allows families to upload a document for your review (birth certificate, proof of residency)

9) Add a File Upload Button
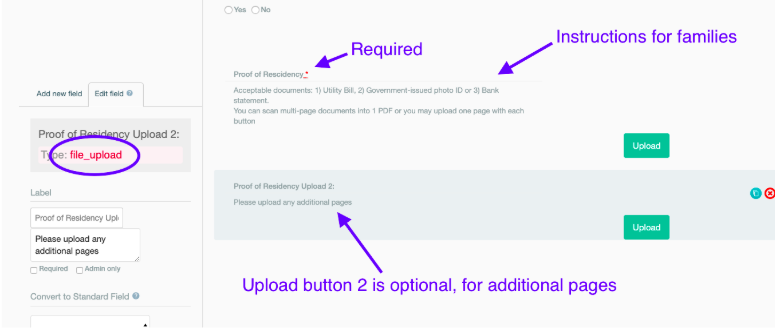
- Step 1: Select the file upload field type
- Step 2: Add Title: Label the upload button for clarity
- Step 3: Add Description:
- Provide a list of acceptable documents for upload
- Remind parents they may scan multi-page documents into one PDF or if they have multiple pages, they may upload one page with each button
- Example: "Acceptable documents: 1) Utility Bill, 2) Government-issued photo ID or 3) Bank statement. <br> (*FYI: including <br> creates a line break in HTML) You can scan multi-page documents into 1 PDF or you may upload one page with each button"
- Step 4: Make upload required or optional
*Pro Tip: In the event that a multi-page document must be attached (if a parent is unable to scan multiple pages into one document), we recommend that admins include two (2) or more upload buttons. Remember to make upload #2 not required!

10) How to Drag Fields to Reorder
- If you’d like to re-order the fields you have added to your form, you can simply click on the field you’d like to move and drag and drop it to your desired location on the form. Once you change the order, don’t forget to Save!
11) Required vs Not Required Fields
- If you’d like to make a question required for families to complete, select the “Required” checkbox on the left side of the form editor > Save the form. The red * means the question is required
- If you’d like to make a question optional for families to complete, leave the “Required” checkbox unselected > Save the form

12) Add HTML Formatting
In order to customize the formatting of the form Label and Description, you may want to use some simple HTML formatting:
- Bold text: <b>This is the text I want to bold</b>
- Line break: <br> When you add the line break operator at the end of a sentence<br>the text afterwards will be displayed on the next line down.<br>
- Underline text: <u> This is the text I want to underline </u>
HTML: Resources:
- Check out this Word to HTML resource: wordtohtml.net
- Check out this Help Center Article on Editing a Custom Form: Using HTML Code
13) Add Conditional Logic (show questions based on previous answer)
When would I want to use Conditional Logic?
- If you’d like to show questions based on a previous answer, you can use conditional logic in your forms. This is a great way to ensure that families only see the questions that they need to respond to.
- Conditional logic allows you to show and hide questions in the form based on
- 1) answers to other questions on the same form; or
- 2) an applicant's attributes (example: School Applying, Grade Applying)
- Conditional logic also allows you to make fields required even if not all users should fill them out.
- To use conditional logic, the field that the conditional question is dependent upon has to limit users to a single response (multiple choice , Yes/No, or dropdown field)
Examples of Use of Conditional Logic:
- Example 1) Question: Is mailing address different from physical address? Yes or No
If Yes > show mailing address fields
If No > hide mailing address fields - Example 2) Question: Do you want to add another guardian? Yes or No
If Yes > show Guardian 2 fields
If No > hide Guardian 2 fields
How To Add Conditional Logic:
- Step 1: Create a multiple choice or dropdown question
- ** Conditional logic can only be implemented based on an answer from a multiple choice or dropdown answer, not a checkbox
- Step 2: Create Question #2 - what question do you want to show based on an answer above?
- Step 3: Scroll down to the left-hand side and select “Turn on Conditional Logic” for Question #2
- Step 4: Select the logic to assign to this field
- IF “Do you want to add another guardian?” is YES, then show this field
- Or, do you want to show the question based on Grade Applying, School Applying, New or Returning Student?
- Step 5: Save and preview the form to view logic
- ** Pro Tip: To check your conditional logic, save and preview the form, fill it out as a user, and think about if there is any way a user would get stuck trying to answer a required question
- Here’s a video!
14) Admin-Only Fields
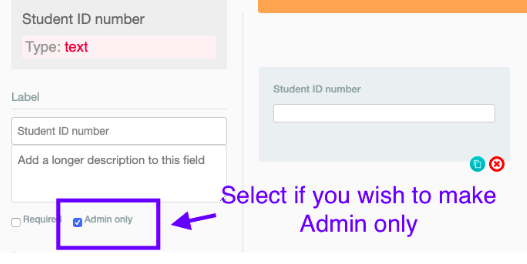
Admin-Only questions are questions that are visible and editable from the admin side only - families can not view these questions.
- Step 1: If you’d like to make a question admin-only (not visible to families), select the “Admin-only” checkbox > Save the form.
- **Pro tip: You cannot make Admin-only questions required, since families cannot fill these out.
15) In Site Support: WalkMe Assistance
If you would benefit from a quick refresher on field types while building your forms, look for the “Show Me How” prompt at the top of the form you are editing.

Follow the instructions to Click “Save & Preview Form” that will reload the page. Navigate from the Preview tab back to your initial Editor tab.

Your form Editor view will now display ? icons that define each field type for your reference.

-------------------------------------------------------------------------------------------------------
Still have questions? Email us at support@schoolmint.com.


Comments
0 comments
Article is closed for comments.